Another advantage of waiting until the tiling had been done, was that we could adjust the height of the kitchen units so that that kickboards would fit snugly underneath without any need to trim them down in height. (The kickboards were a hollow 'stainless steel' effect, so unlike their solid wood counterparts, it did not look like cutting them down lengthways would be either easy or neat).
We adjusted the legs of the kitchen island until the kickboard could fit underneath, then levelled everything off and made sure all the cabinets lined up.

Once we were satisfied with the height of the units, we could join all the cabinets together. We removed the drawers in order to use concealed fixings inside the cabinets. The two rows of units were also bolted together using a variety of brackets and battens that ran along the backs of the cabinets.

After several months cooking with only a halogen oven, it was exciting to take delivery of our new kitchen oven. The smooth, glossy floor tiles make it so easy to move heavy objects - just drop it on a dustsheet and drag it into place.
(Note the new doormat fitted in the mat-well behind).

Fitting the oven was not going to be straightforward (of course...) It's not possible to fit a double oven directly underneath an induction hob - the manufacturers just don't allow the room, so our oven was going to be located on one side of the island.
Usually the oven would sit on steel supports attached to kitchen cabinets on either side. But since our oven would be located in the corner of the island, with no cabinet next to it, it could only be supported on one side. Not being kitchen fitters, we had to figure out our own solution and the best idea was to build a wooden plinth that could act as both a raised base for the oven, and also give us something to attach the decorative end panels to.
We raided the scrap wood pile (yet again) and built a simple frame using studwork timber held together with hefty coach bolts.

We tailored the frame to the same height as the kickboards, so the oven should line up perfectly with the rest of the drawer units.

Then we lifted the oven into position. The wooden plinth shouldn't be a safety issue as these ovens have barely any heat coming out the bottom, however we used the steel supports screwed underneath as an additional precaution. We'll tackle the end panels for the island a bit later...


Decorative end panels are always stupidly over-priced, so in order to save money we cut them in half wherever possible. The dishwasher had end panels running either side of it, but only the front face of the end panels would ever be visible, so it was much more cost effective to use one panel cut in two. It also gave us a bit of extra room to try and fit the rather unwieldy hoses behind.

After the end panels were screwed in place, we could refit the dishwasher. It was a tight squeeze so we were very glad we tiled under all the appliances, as having a 'step' to negotiate would have made fitting extremely awkward. (N.B. It will eventually be plugged in via the fused spur below the worktop).

With the end panels and dishwasher installed, the rest of the units could be lined up, joined together and screwed to the wall.

We were also going to use a full-size decorative end panel to finish off the line of cabinets...

... but first we thought it best to paint the kitchen walls. This would save having to paint edges where the end panels meet the walls.
As ever, we used Little Greene's intelligent matt (washable) and since we were getting so much sky reflected off the floor tiles, it seemed rather appropriate to use a shade of blue called 'Gentle Sky'.

After two coats of paint, we were ready to resume work on the kitchen. The end panels come over-sized so that they can be trimmed down to suit requirements. First step was to cut them to the correct height (making allowance for any 'slope' in the tiled floor) and then clamp them in place.
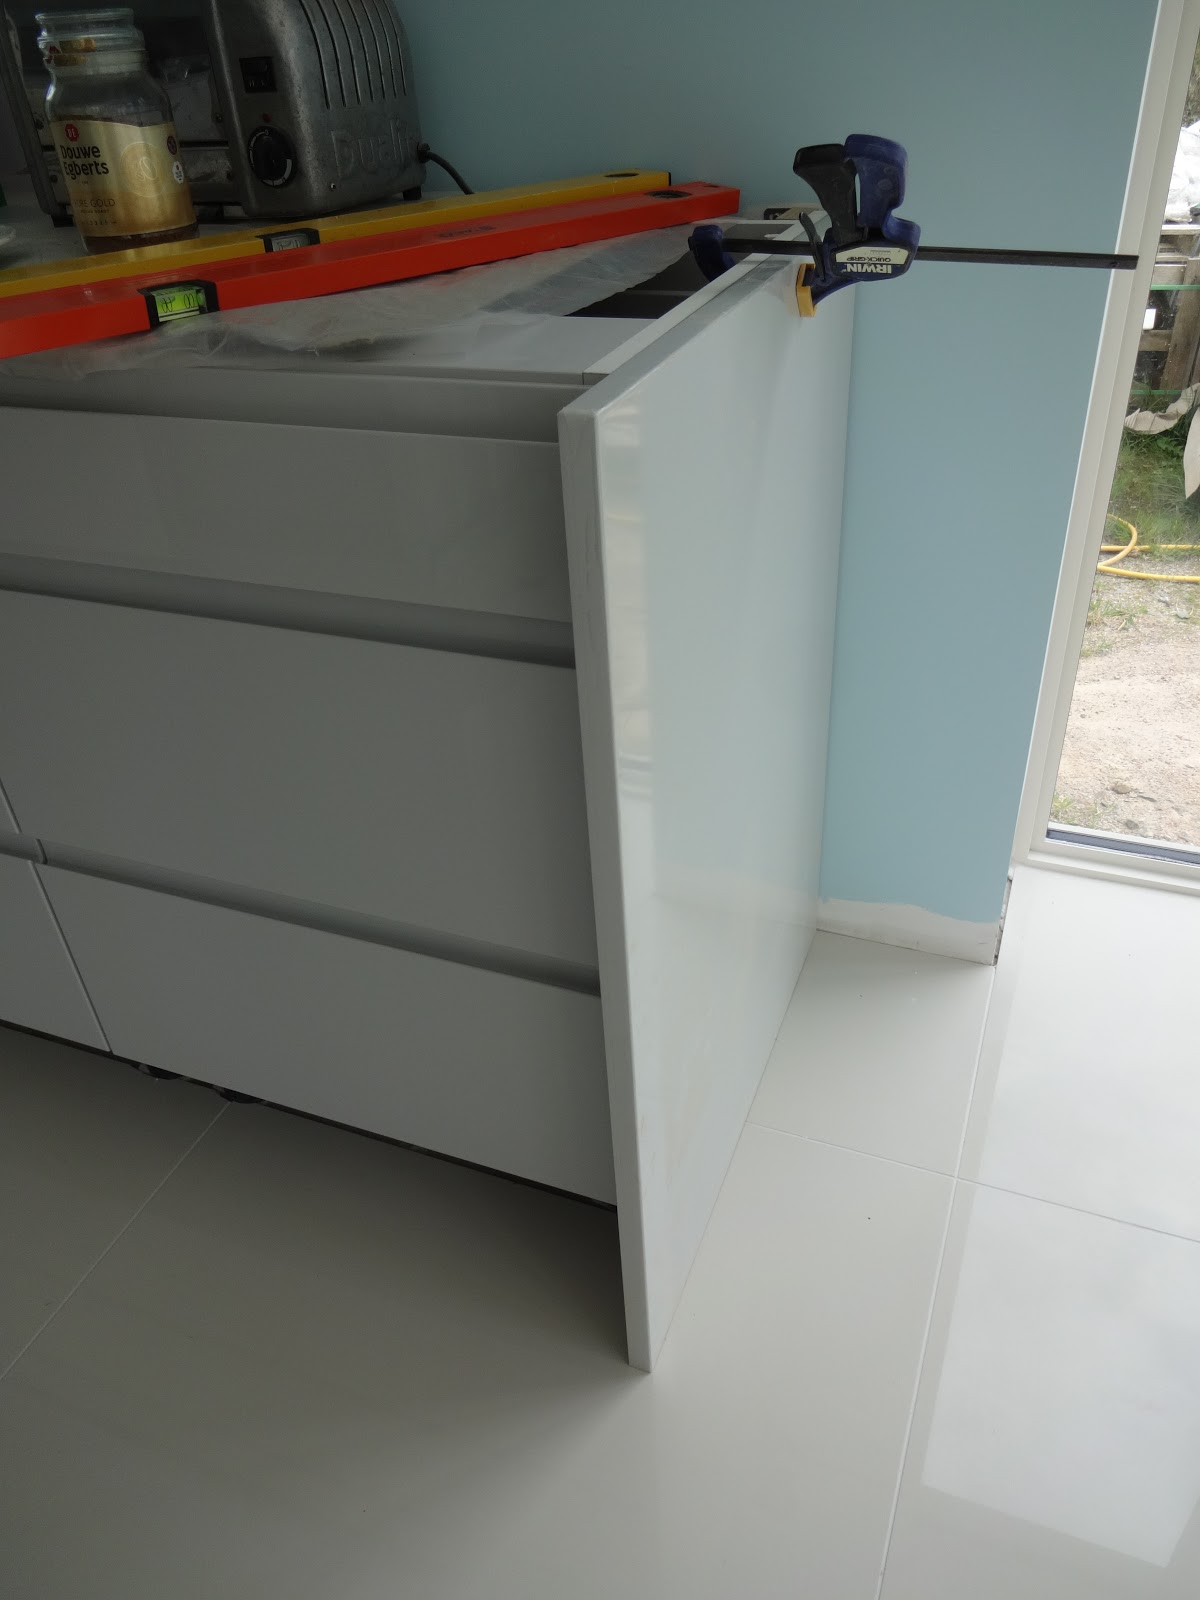
The front face of the panel has to be perfectly vertical to match the rest of the cabinets. Once it had been clamped into position, we could work out exactly how much needed to be cut off the back of the panel to ensure a perfect fit against the wall.
Walls are never straight so usually kitchen fitters would scribe their cutting line (i.e., use a compass/dividers to follow the uneven contours of the wall and mark a line that corresponds to that). Since we'd used a 'dry' walling system with no plaster, our walls were very flat and even, so we didn't need to scribe, though would still need to cut at a slight angle to compensate for the wall being slightly off vertical.

Having established exactly how much to cut from the panel, the next problem was how to get a nice clean cut in the gloss-coated finish. Using any kind of conventional saw would leave the edge looking chipped and ragged. Looking online, there were a plethora of contrasting opinions on this matter, so once again the only way to really be sure was to experiment for ourselves.
We tested out various methods on some off-cuts - masking tapes, clamping wood to the panel, router, etc. The cleanest cut seemed to come from using a very fine tooth blade in the plunge saw, but even that sometimes left tiny chips. In the end, the best solution was to use the plunge saw to cut the panel to within 1-2mm of our line...

... then 'fine-tune' the edge using a power sander. A bit time-consuming, but this method removed all the 'micro-chips' in the gloss coating and made it possible to follow the exact contours of the wall.

Trimming the panels to size exposed the MDF core. This material does not react well to dampness (swells up and falls apart) so it was important to seal these cut joints before fitting. Two coats of waterproof wood glue worked well as a quick-drying sealant and would prevent any concerns about water penetrating the MDF once it's sitting on the tiles (for example, when mopping the floor or after accidental spillages).

Thankfully after all that work, it was a perfect fit. We clamped it in place and secured it invisibly using short screws drilled in from the inside of the cabinet.

To finish off, we cut the kickboard to the right length and installed it under the cabinets.

Same process on the small bin cupboard. First we adjusted the height to match the other kitchen units and secured it firmly to the wall with L-brackets.
We fitted (half) an end panel to the wall side...

... and a full-size end panel (painstakingly cut down, sanded and sealed) to the other side

Next we installed the 'stainless steel' kickboard and adjusted the door so that the gaps were even on both sides.

All it needs now is a worktop...

... but at least we had somewhere to chuck all our rubbish.

The next job was working out exactly where we wanted the induction hob. Being amateur kitchen fitters, we weren't quite sure of its ideal position, so we experimented with a cardboard template to see what felt right.

After extensive research with our cardboard hob (using pretend pots and pans) we ascertained that the ideal distance from the counter edge to the hob is this.

Although a bit short, this sheet of OSB (leftover from the attic room flooring) would work as a temporary worktop. We cut out a rectangle for the hob to match the template. The depth of the induction hob meant that sections of the cabinet underneath would also need to be trimmed away.

With the hob cutout prepared and the oven also in place, it was time to call in our friendly neighbourhood electricians, the two Aarons, to wire up the appliances. The electricians have been happy to sign off on most of our DIY electrical installations, but cookers and other high current appliances would need to be installed by them.

Power for the island came from a hefty cable installed in the floor during the 1st fix installation. It seemed like a lifetime ago... (and the kitchen has changed a bit since then).

Once the electricians had done their bit, we had a working hob and oven. We fitted a couple of OSB off-cuts to extend the temporary worktop and at last we had a usable cooking area.

Once we knock down the old house (situated right outside the full-length windows) we will have much more light coming into the kitchen, but even so, there is so much light bouncing off the floor tiles (also reflecting up onto the ceiling)

The
island still needed its decorative end panels and kickboards, but we
wouldn't be fitting them until a bit later (see the next thrilling
instalment of this blog...)

Kitchen slowly taking shape.

No comments :
Post a Comment