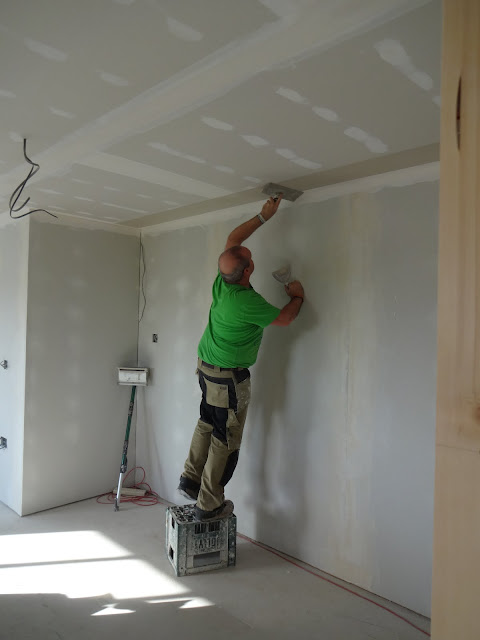
Having finally completed the boarding of the walls, the next stage was the jointing.
With Fermacell the jointing process is fairly straightforward; unlike plasterboard the sheets are glued together, so compound only needs to be trowelled thinly over the joints and screw holes in order to fill any gaps and irregularities.
With Fermacell the jointing process is fairly straightforward; unlike plasterboard the sheets are glued together, so compound only needs to be trowelled thinly over the joints and screw holes in order to fill any gaps and irregularities.

Having used a combination of string lines and lasers to painstakingly line up the sheets when boarding, our walls were reasonably well aligned which made the jointing process a good deal easier.

The Fermacell jointing compound is very strong, but not particularly easy to use. We found it dried out extremely quickly so had to be mixed in small batches and applied fairly rapidly before it became unusable.
We started out by doing a thin pass of compound over all the joints and screw holes.

Once the first layer of compound had dried, we lightly sanded it and applied a second layer. This was done using a wider trowel in order to help blend the joints and make them less visible.

We were relieved that we had decided against using the smaller size Fermacell panels when boarding. All of our struggles to board using large, heavy sheets of Fermacell were paying dividends when it came to jointing, as we had far fewer gaps that needed filling.
We applied two layers of compound to every wall joint in the house.

During the boarding, we had followed Fermacell's instructions and left a 5mm gap between the top of the walls and the plasterboard ceiling. To avoid any cracking in future, Fermacell's technical department then recommended using flexible caulk to fill those gaps (along with similar gaps in the internal corners) but after experimenting with it ourselves, we were less than impressed... even the best quality caulk shrinks as it dries, which makes it almost impossible to get a crisp, internal corner. The fact that caulk cannot be sanded either, made the whole process seem like a really bad idea.
One simple solution would be to conceal the ceiling gap under coving, but that would not suit the clean, contemporary look we were trying to achieve... it was clear we needed to find a better way to do this.
One simple solution would be to conceal the ceiling gap under coving, but that would not suit the clean, contemporary look we were trying to achieve... it was clear we needed to find a better way to do this.

After working 7 days a week on the house throughout the winter, our enthusiasm, motivation and energy for the build had reached an all-time low.
The boarding had already taken a lot out of us, jointing and finishing 600 square meters of walls was a gigantic (not to mention, rather tedious) task and the prospect of also having to tape and joint another 300 square meters of plasterboard ceiling was making us thoroughly depressed.
It was clear that we needed a boost...

As ever, the internet provided a solution; Alan came across photos of a posh house build on the Cornish coast that featured oval ceilings with some impressive-looking taping and jointing work. A few email enquiries later, he had managed to contact Tony, the dry-lining expert responsible and as luck would have it, Tony's next job had just been postponed, so he was available the following week... A quick site visit to see our ceilings was arranged and after a brief negotiation on price, Tony was contracted to do the work.
We had originally intended to do the ceilings ourselves so weren't sure if we were doing the right thing, but hiring Tony immediately helped solve the caulk problem. Unlike anyone else we had talked to, Tony had experience of using Fermacell and he agreed that their method of using caulk to fill the gaps between the walls and the ceiling just didn't work. He recommended filling the gap using reinforced fiberglass corner tape embedded in plasterboard jointing compound. It was a relief to leave someone else to sort out the problems for a change.
The gap between the walls and the main bedroom vaulted ceiling would be the trickiest to sort.

Tony began by filling all the ceiling/wall gaps with a thick, gluey compound mix.

The thick compound was just there to act as a base layer; fiberglass corner tape would be added later.

Tony also taped all the ceiling joints and began adding his first coat of compound. He started off by doing all the plasterboard butt joints.


Butt joints in the kitchen ceiling.

The next day, Tony tackled all the long joints and screw holes. He was very complimentary about our boarding and said it was making his job much easier.


Next stage in dealing with the wall/ceiling gap was to apply Fibatape to reinforce the internal corners and hopefully prevent any cracking in future.

Another layer of compound is spread onto the joint and the Fibatape is gently embedded into that...

... then pressed flat using a spreader.

We weren't sure how we were going to finish the area around the stairs, but since Tony was jointing all the ceiling edges, we decided to quickly fit some Fermacell to the metal web joist in the stairwell.

Once we'd fitted the Fermacell panel, Tony put metal corner tape over the joint and blended it into the ceiling.

It cheered us up to see things progressing so quickly; by the end of the second day, Tony had done his first coat both upstairs and down. Even better, the un-seasonal warm weather was helping to dry out all the joints a little faster.
Bedroom 3

Bedroom 2.

Main bedroom. The light coming in to the south-facing, ceiling-height window could show up every lump and bump, so Tony explained he would be taking extra steps to stop the joints from showing.

As with the Fermacell wall joints, a second (wider) coat of jointing compound goes on next.
Tony used a box spreader to apply the compound to the joints, then levelled it off with a trowel. It was a very neat and quick method.


Kitchen ceiling is beginning to take shape. It looks so much better once all the separate panels are concealed.

A third coat of compound was applied to all the internal corners.


We had to remove the bottom panels in preparation for the balcony which was due to be fitted soon.

Tony blending the wall/ceiling corner joints with yet another layer of compound.


Err, don't try this at home, folks.
As if Tony's wobbly plank-on-wobbly-ladder trick wasn't bad enough...

... how about this for an encore? Not one for the health and safety handbook.

Luckily Tony survived his high-wire act and went on to complete the lounge.

Once the second coat was dry, Tony applied a third, even wider layer of compound to all the joints. In the main bedroom, he also added a very light skim coat over the whole ceiling to help conceal the joints even more.


After a couple of days, all the joints were dry enough for sanding and Tony returned to smooth everything off.

Tony brought his son along to help with the sanding.

The finished corner joints look pretty sharp. We were glad we didn't caulk it as Fermacell had suggested...

Having all the right tools certainly made the job a lot quicker and easier. Tony's sander made short of work of smoothing down all the joints. Doing it ourselves by hand would not have been much fun.

After sanding, the ceiling joints were looking very flat.

Once everything had been sanded, Tony added a coat of plasterboard sealer to all the ceilings in the house. As two different materials, plasterboard and jointing compound can absorb paint differently so using sealer helps provide an even base coat for the paint.
Completing all the work, had taken Tony less than a week and the results looked very good. More importantly, it helped inject a much-needed boost to our flagging motivation. Tony also offered a lot of useful tips about how we should tackle the finishing of the Fermacell walls, so hiring him really felt like money well spent.

No comments :
Post a Comment