Thursday 16 October 2014

Heating: Ground Floor - Screed

We'd arranged to have the screed poured a few days after we'd installed the underfloor heating pipes. This gave us time to make sure there were no leaks in the pipework and we left the system pressurised during the screeding process so any accidental pipe damage would show up as a tell-tale stream of bubbles.

The first job for screeders Rich and Jamie was to set the levels so that the screed would be poured to the correct depth. Getting this right was critical so Rich used a laser to accurately work out the levels required.


We'd originally planned to have a 50mm screed but Rich's laser measurements soon revealed a slight problem; the front door had been set too high. Due to regulations about wheelchair access, the only practical solution was to increase the screed level throughout the whole house to compensate, which meant that the screed would now be up to 75mm in some places.

Metal 'spiders' were set out in every room and these were used as markers for the screed depth.


Although it is slightly more expensive, we chose to use liquid screed rather than the more traditional sand/cement screed for several reasons. It is less labour-intensive and therefore much quicker to install. It dries quicker, is less prone to cracking and has better thermal efficiency. It also meant avoiding using any more 'wet trades' (i.e plasterers, ground-workers, brickies etc.) who I've found to be completely and utterly off their trolleys.


The pre-mixed anhydrite screed was delivered on site. Once Rich was happy with the consistency, it could be pumped directly into the house.


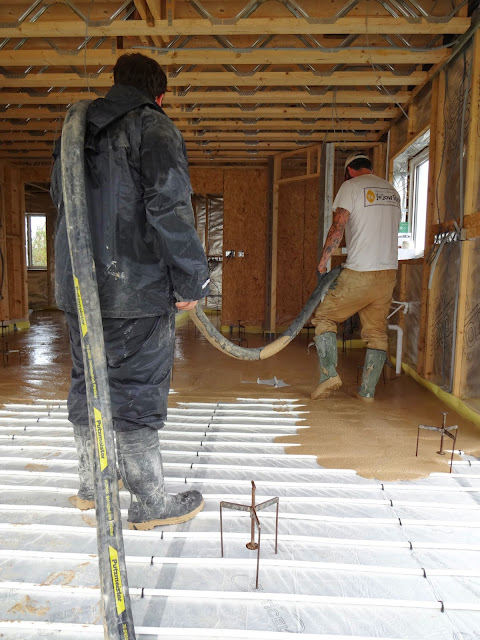
This is the moment where you hope you have sealed the floor enough...


The pipe was extremely heavy even when empty. Once the screed was flowing through it, it needed two people to lift.


The last room to be screeded was the kitchen/diner. The whole of the ground floor had been poured in less than 20 minutes. A conventional screed would have taken at least a week (probably more knowing what plasterers are like!)


Jamie checked all the spiders to make sure the screed level was correct before removing them all.


The final stage was tamping to remove any air bubbles hiding in the screed.


Once the tamping was complete, the house was locked up for two days to allow the screed to cure. It is surprising how much heat this process generated and the windows steamed up with all the condensation.


After 48 hours the screed was dry enough to walk on. The site inspector wasted no time in conducting a thorough examination of the whole house.


He approves of the screed. Hooray for the site inspector! 


Saturday 4 October 2014

Heating: Ground floor - Insulation and pipes

With all the 1st fix plumbing and electrics in place, we were able to start work on the heating system. We had chosen to use underfloor heating for both the ground and first floors, though each floor would require slightly different methods of installation.

For the ground floor, the first step was to lay sheets of insulation through the whole house.


Nowadays, building regulations require quite a lot of insulation to be placed under the floor, especially when using underfloor heating as this helps prevent the heat from being lost through the ground.


Before we could start laying the insulation, we had to do some preparation for the liquid screed. Alan built some mini-partitions between some of the internal wall studwork which would prevent the liquid screed from flowing into the wall cavities.


This type of insulation is expensive. To save on wastage, Alan worked out exactly how much insulation we would need and even drew up a 'jigsaw-piece' plan that utilised all the off-cuts.


More prep. Alan used a hammer drill and angle grinder to cut away the dolly blocks in the doorways. Now you see them...


... now you don't.
The blocks needed to be removed as there would be underfloor heating pipes running through the doorways.


The first sheet of insulation is laid. Only another 74 square metres to go!


Pipes and wires running on the concrete floor were a bit tricky. This conduit carried the cooker wire from the wall to the kitchen island, so we cut a groove in the insulation to fit.


Final check to make sure everything lines up...


...it does. Hooray! That's the kitchen finished.


The study is nearly done and waiting for its designated off-cuts from another room.


The lounge is finished.


Removing the dolly blocks from around the front and side doors proved to be a bit more involved. Alan had to re-jig some of the door frame supports in order to get the blocks out. He also had to be very careful not to damage the paintwork on the new doors themselves.


With the blocks gone, the floor is ready for insulation.


The site inspector appreciated the increase in floor height as it allowed him to see out of the front door.


The downstairs toilet was particularly awkward because it contained four sets of pipes to contend with.


What a nuisance! This piece took some carving, but was a good fit... eventually. Bah!


Alan's plan worked really well and we finished laying the insulation with barely any waste. Though the insulation was tightly fitted through every room, I taped all the joints with duct tape to ensure that there was no chance of any movement.


The liquid screed would be pumped in on top of the insulation so we needed to ensure that every room was a watertight tub. To achieve this, we laid out heavy gauge polythene sheeting.  


A yellow foam strip was attached around the perimeter of each room to allow for the screed to expand and contract while it dries.


The underfloor heating pipes waiting to be unwrapped and installed.


The pipe laying begins. We had a set of plans to work from so it was relatively straightforward to unroll and clip down each circuit.


As our system will be powered by a heat pump (rather than a traditional boiler) the pipes were designed to be laid close together. This meant that we had to be careful not to kink the pipes when bending the loops.


Alan cut measured lengths of batten to use as a gauge so the pipes were equally spaced. In the kitchen, we left spaces for the kitchen cabinets and the island as there was no point heating under those areas.


Each zone uses a complete, unbroken length of pipe that stretches from the manifold, looping through a room and then back to the manifold again.


Where pipes crossed a door threshold we created 'movement joints' by using conduit sleeves. These help prevent any cracks appearing later in the screed.


All roads pipes lead to Rome manifold.


As this was our first time installing underfloor heating and considering the grave consequences if it should go wrong after the concrete screed had been poured, we felt it best to get a plumber in for a few hours to help set up the manifold and pressure test the system.


Our ground floor heating plan up on the wall for reference.


As you can see from these pictures, the site inspector was absolutely ecstatic with our progress.