Friday 26 September 2014

Cluster flies

Despite all our careful plans, there are some things for which you cannot prepare...


The warm autumn weather brought with it an unexpected and distinctly unwelcome arrival - cluster flies! As their name suggests, these little gits 'cluster' together in great numbers and are notoriously difficult to eradicate.

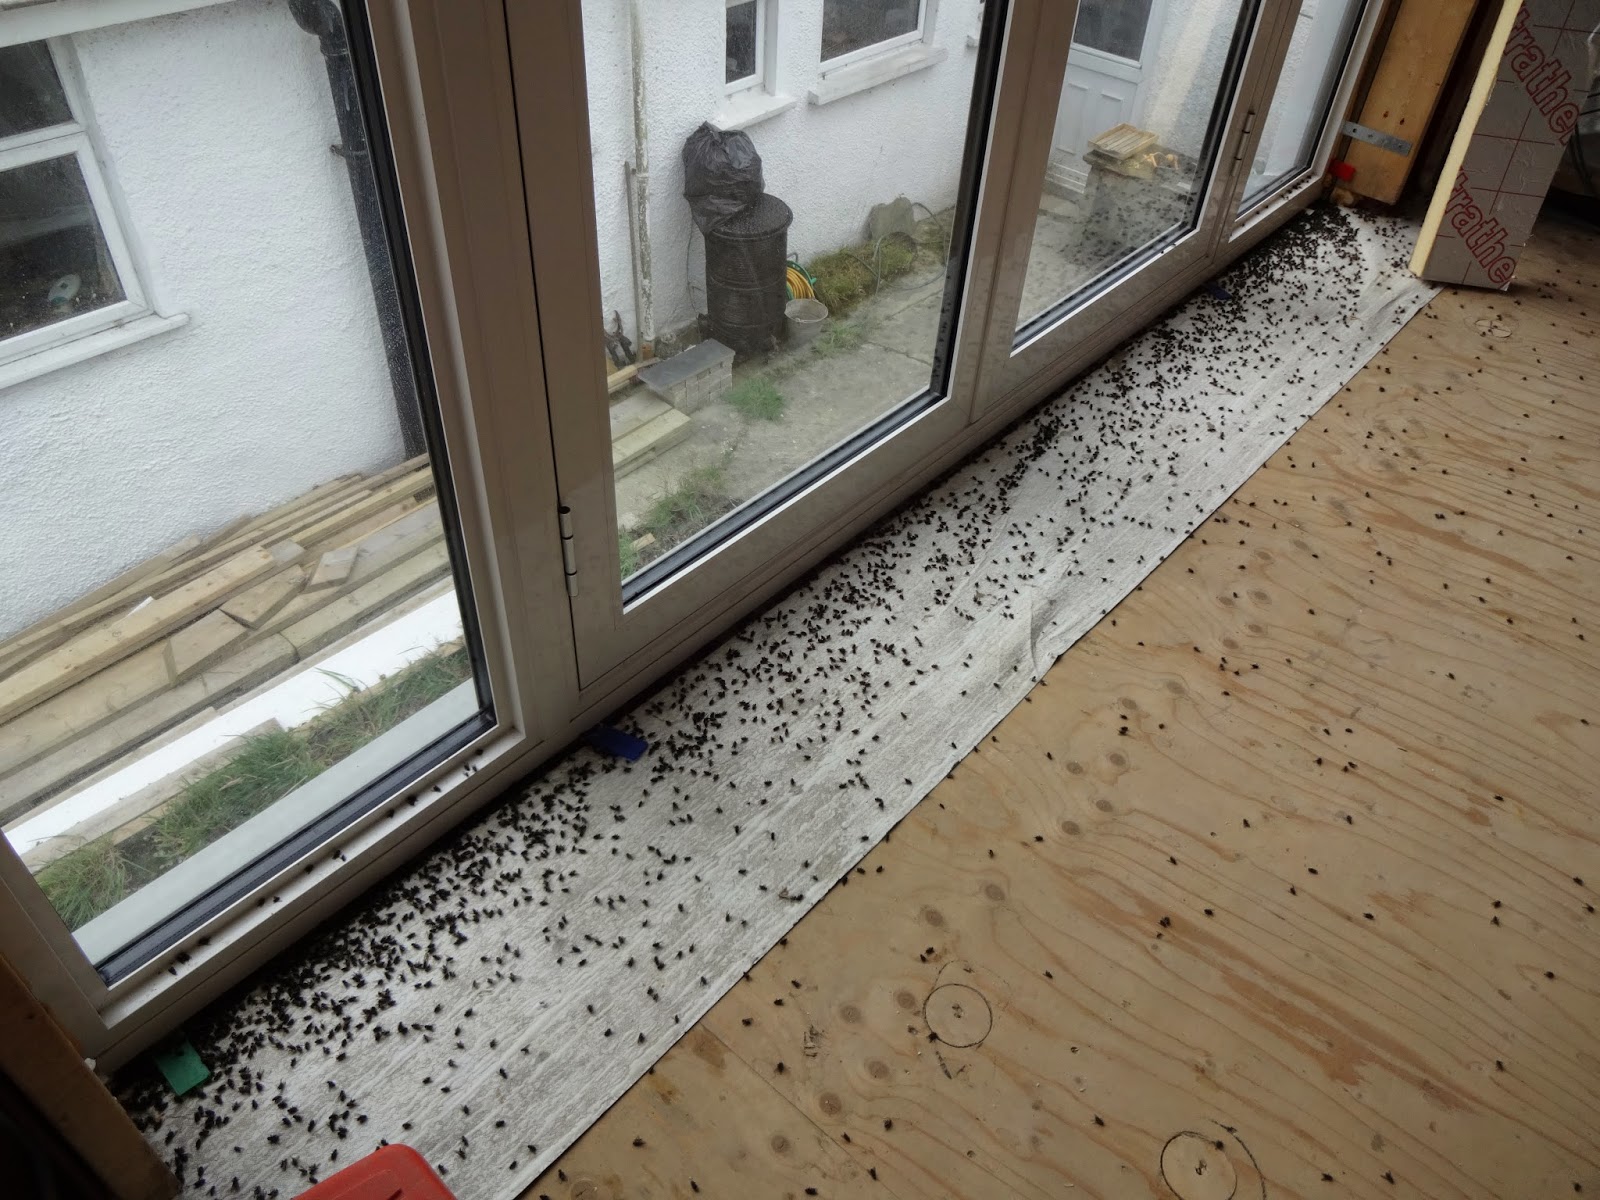
Despite vacuuming them up several times a day, the picture below shows the huge carpet of dead/dying flies that greeted us every morning - yuck!


Cluster flies are not to be confused with normal houseflies - they do not carry disease as they do not feed/land on faeces or such things as food left-overs. They eat vegetation and do not lay their eggs inside your home, but outside in the soil near earthworm burrows. The larvae then use the poor earthworms as a host...


Unluckily for us, these cluster flies are particularly attracted to large, white, south-facing buildings surrounded by fields - typical.

Often referred to as 'attic flies', these pesky things spend the autumn looking for a suitable place to hibernate. All it takes is one scout fly to find its way into the house and lay a pheromone trail. This acts like a gigantic beacon attracting and guiding other cluster flies from miles around. We could even smell the pheromone ourselves - it was an unpleasant smell, rather like a giant stale ashtray.

The situation was exacerbated by the fact that we had not fitted any ceilings in the house yet, so any flies getting into the roof-space were able to spread freely all round the house. An infestation begins...


It was relentless. No matter how many thousands of these flies we vacuumed up, thousands more kept arriving every day to take their place. Our industrial vacuum cleaner actually broke under the strain of having to swallow up so many of these things. We needed to find a way to stop them, but after much research, it seems there are no effective repellents available - even commercial pest control operations can only offer short term solutions in the form of chemical sprays and smoke bombs.


The first thing we needed to do was find out how they were getting in and try to block off their entry points.

One of the drawbacks about building such a well-ventilated roof was that the cluster flies were able to squeeze through the fascia vents that run along the bottom of the roof. We fitted some fine mesh over the whole length of the fascia vents (this took a few days - as if we didn't have enough to do!)


We also used left-over strips of breathable roofing membrane to block off any other obvious routes into the house, such as the gaps under the slates at the gable ends.


While we tried to seal everything up from the inside, outside the house nature decided to lend a helping hand. Several pairs of wagtails (both pied and yellow varieties) soon arrived to feast on the growing numbers of cluster flies that were now unable to get into the house. If you look carefully in the photo below, you can see the numerous black dots crawling over the outside walls and Mr Wagtail stationed at the very top of the roof.


A pied wagtail hard at work. They stayed from dawn until dusk, each gobbling up flies at an incredible rate.


The cluster fly infestation was not helped by the fact that the farmer decided to plough and re-seed several of the pasture fields next to us. This seemed to make it easier for the cluster flies to find earthworm burrows to lay their eggs and increase their numbers more than usual.


The ploughed field next to us looked like a sandy beach. Flocks of seagulls arrived every day to partake of anything that emerged from the soil (including the dratted cluster flies).


A buzzard takes a stroll along the 'beach'.


Saturday 20 September 2014

Services: Water - Shed 3

With the water filters installed and working well, we could finish building the shed. The verandah roof was already watertight but we added felt shingles to enhance the way it looked (and match the look of the summerhouse that we had based our design on).


The felt shingles fitted in place and awaiting the row of ridge tiles to finish the roof off.


While Alan worked on the roof shingles, I applied a sage green stain to the external timber. The shed was already weatherproof as we'd used tanalised (pressure treated) wood so the stain was really just to add some colour.


Two coats of wood stain applied. Alan made and fitted trim panels to the sides of the roof to cover the edges of the felt and give it a neat finish.


Trim panels stained to match. The sage green stain really helped soften the look of the shed and allowed it to blend in with the plants and trees around it.


With autumn approaching, we needed to get the windows and doors fitted as soon as possible. Alan had planned to make these himself but with so much still to do on the house, it became clear that he wouldn't have time. This posed a bit of a problem as the shed companies charged a fortune to supply windows and doors, however after some digging around Alan managed to find a small manufacturing outfit who make windows and doors... for the shed companies. They agreed to make us a set of custom-sized window and door frames for a very reasonable price (i.e., the window frames were only around £20 each).


After a few minor adjustments with the sander, the window frames slotted neatly into place.


Fitting the doors was slightly trickier.


The first job was to cut the bottom of the doorway out.


Then Alan made and fitted a door liner (a frame to hang the doors on).


After much adjustment, the double doors sat correctly and like the window frames could now be taken off and painted.


Painting the frames took a few days - we used preservative followed by several coats of a good quality exterior wood paint to protect the untreated timber.


Alan ordered glass cut to size from a local company and fitted it into the window frames using timber beads, before finally installing the windows into the shed.


Alan chiseled out sections of the doors and frame for the hinges.


Ta-da! Getting the doors to hang correctly took a bit of time.


Double ta-da!


Now that the doors lined up correctly, it was back to the 'workshop' (what will be the kitchen in the new house) to fit the door lock and handles.


We used toughened glass for the double doors which added quite a bit of weight so Alan was glad he used 3 pairs of door hinges instead of 2.


Alan added timber strips to the inside of the door frame to act as door stops.


Doors and window are fitted just in time for the autumnal winds and rain. One unexpected problem was that the door handle could smash into the window (on the right) if the door swung out fully...


... so Alan made up a decorative trim around the outside of the frame which would stop the door from opening out too far.


A few finishing touches to the handrails...


... and extra weatherproofing trim for the centre and bottom of the doors.


Sunrise over the newly-completed shed.


Spot the difference... this is the original image we found online that Alan used to draw up our shed/summerhouse plans...


... and this is the shed/summerhouse that we built from those plans.


Another photo of the shed we used for inspiration. If you want to buy this, it will set you back around £10,000...


... ours cost a few hundred quid in materials (and I'll even throw in the guitarist for free!)