Who needs a van when you've got a Mazda? Room for 45 planks (46 if you include the driver).

This was how we transported the door liners to the house. We never see police cars patrolling the roads in our area, so Alan couldn't believe it when he turned a corner in his 'mobile skip' to find two policemen parked right in front of him. Luckily, as he trundled past, all they did was sit there open-mouthed and confused about what they had just witnessed...

To finish boarding the walls, we had to install all the door liners. These are available to buy off the shelf quite cheaply, as long as you are using standard sizes. Of course, using a non-standard system like Fermacell for boarding the walls, meant that door liners designed for plasterboard-covered-with-plaster were going to be too wide. Grr!
The most economical solution was to buy the standard size door liners and get them planed down to size at a local timber yard. They agreed to plane down all 45 planks to the exact sizes we needed for just £20. Hurrah!
After spending so long boarding the walls, we were hoping to speed the build up by hiring a carpenter to fit the door liners. But once again, finding decent tradesmen in our area who weren't booked up for months in advance or weren't quoting a king's ransom (or who could be bothered to even call us back) proved impossible, so we decided to take on the job ourselves.
Following much research, we got started. The first job was to assemble the door liners using glue and screws. Alan also cut the legs down to the right height for our doorway.
Following much research, we got started. The first job was to assemble the door liners using glue and screws. Alan also cut the legs down to the right height for our doorway.

It's crucial that the door liners are exactly the right size or the doors won't fit properly. Once we'd measured the frame and lined it up perfectly square, we screwed in battens to brace the liner and prevent it getting knocked out of alignment during fitting.

Since it was our first attempt at fitting a door lining we spent a long time making sure everything was exactly right. Lots of checking and re-checking using the laser and spirit levels until it was lined up correctly from every angle.

The door lining needs to support the weight of a heavy door swinging on hinges, so a lot of long screws are used to secure it in place. We used packers to make sure the wood didn't get twisted as the screws went in and also to take out any warps or twists in the liner itself.
Once it was all fixed in place, we could remove the battens we'd used for bracing. One down, 14 to go.
Once it was all fixed in place, we could remove the battens we'd used for bracing. One down, 14 to go.

Before fitting each door liner, we beefed up the studwork with extra noggins to make sure everything would be absolutely rigid.

The site inspector arrived to make sure the new noggin work was up to scratch...

...and scrutinised the job from top...

...to bottom.

The door liner for the study/office going in. We used a laser (just visible glowing on the right) to set up the positioning initially. Once the packers were in, we found fine adjustments easier using a long spirit level; when the level sits perfectly flat against the liner with no visible gaps, then the liner has to be straight.

That's the study done. It will be much easier to board accurately around the doorway now the liner is in.

We had quite a lot of door liners to put together so started something of a production line in the kitchen. To make it easier, the door liners come with pre-cut slots that match two standard door sizes. Most of the doors in the house use the larger size, but we decided to use the narrower size for cupboard doors.
These are two of the smaller size liners assembled and ready to be fitted in the main bedroom.

The larger-sized doors used everywhere else in the house are designed to allow wheelchair access, which makes them rather unsuitable for smaller rooms and cupboards because they take up quite a lot of space. So we decided to use the narrower doors for both the walk-in wardrobe and en-suite in the main bedroom.
Switching to the narrower door liners meant that we had to make changes to the studwork. That was a bit of a pain but having previously moved the toilet in the en-suite, we needed to make sure that the door would have enough space to swing clearly past the toilet pan.
Switching to the narrower door liners meant that we had to make changes to the studwork. That was a bit of a pain but having previously moved the toilet in the en-suite, we needed to make sure that the door would have enough space to swing clearly past the toilet pan.

The site inspector inspecting the new studwork and door liners. It's always a tense time waiting for his approval.

Nothing escapes the scrutiny of the site inspector. Once he was satisfied with the new door liners, he made an unexpected move to inspect...

...me!

Once the door liners had been installed, we cut away any protruding packers using a multi-tool (these will only get in the way when we come to board around the area).

Completed door liners. Walk-in wardrobe on the left and en-suite on the right.

The landing cupboard upstairs had been an afterthought, added at the end of the corridor primarily to store the heating manifold, bathroom toilet cistern and ventilation pipework. As it had never been part of the house plans, there was no studwork for it, so we made up our own (out of leftover materials, of course).

Fitting the studwork around the back of the toilet cistern (on the left of the picture) proved a little awkward.

Such a small cupboard only needs a small door, so we decided to use even narrower doors for this and the larder downstairs. It would mean customising the door liners (which are only pre-cut for two sizes of doors) but it would still allow for a standard-sized door when we come to buy those.
Alan came up with an interesting way of securing the stud walls, using all manner of screws and bolts.

The toilet frame in the bathroom was bolted to the new stud wall to make sure it was absolutely rock solid. You don't want any movement in your wall-hanging toilets (snigger!)

Once the landing cupboard studwork was in, we could install the bathroom door liner.

Ugh! More studwork to re-do. The cupboards in bedroom 2 and 3 were originally supplied with large apertures for sliding doors (not sure how that happened). Then Alan reduced the studwork to fit the large size doors we thought we'd be using. Now we needed to take it all apart again, in order to accommodate the narrower doors we'd decided to use for all our cupboards.

Having used good-quality screws rather than nails, it wasn't too hard to dismantle the studwork we'd already built.

A few longer noggins and it wasn't too long before the studwork was ready for the new smaller-sized door liner.

Done.

Exactly the same job had to be done in bedroom 2.


Once the door liners had been fitted and the packers cut away, the last job was to foam all the gaps. This was a tip from one of the carpenters we spoke to and it worked very well; once the foam had dried the whole thing felt incredibly rigid and less hollow sounding. The doors should hopefully have a reassuringly solid 'thunk' when they close.

The load bearing walls in the ground floor presented more of a challenge. Firstly, they hadn't been installed perfectly square or indeed to the correct width by the timber frame company and secondly, being skinned in a layer of OSB meant it was impossible to change any of the studwork. Hmm.

An electric planer helped deal with the studwork being too tight; having four studs nail-gunned together on either side of the door meant that was the only way to widen the opening anyway.
The next thing was to make sure all the doors in the hallway were the same height. We used the laser to set the level to match the previously-installed study door.
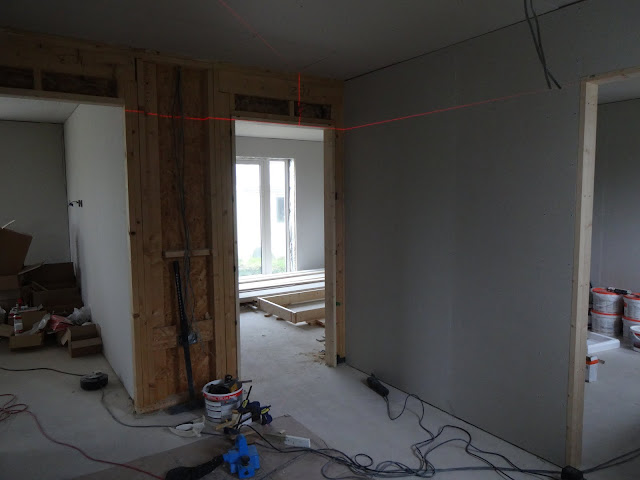
Same again for the kitchen door.

Spooky. Our cheapo laser worked better in the dark so we didn't mind working late.

The studwork around the utility room entrance also needed extensive surgery to get the door liners to fit. We weren't sure if the timber frame company had got it slightly wrong, or whether it had moved as the house settled (it had been up for a couple of years after all...)

We couldn't find any door liners pre-cut for narrower doors, but it wasn't much trouble to modify the ones we had. Alan marked out the size we would need...

...then used a chisel to cut new slots.

Same process as before for assembling the two smaller door liners.

One of the extra-narrow door liners was for the larder. The kitchen island won't be too far from the larder, so a wide door would have just got in the way.


The other extra-narrow door liner fitted neatly into the new studwork for the landing cupboard.

It's finally starting to look like a cupboard.

Because of the layout of the outside walls, the door liner for the main bedroom was a completely different size to all the others. There was no way to modify an off-the-shelf door liner, so Alan made up his own.
He bought some redwood planks and decided to try cutting out all the slots for the legs using a chopsaw rather than a chisel (hurrah for the internet).

After setting the depth of the cut using some scrap wood, it was just a matter of making several cuts very close together.

A lot easier than using a chisel. And the wood was much better quality than the standard door liners we bought. Next time, we'll just make our own...

The custom chunky main bedroom liner. The last one to roll off the production line (thank goodness).

And here it is after we fitted it. Yay!