Tuesday 9 February 2021

Demolition: Old House (part 6): floors and site clearance

RUBBLE TROUBLE.

With the worst of the winter gone, it was time to resume the demolition of the old house. We'd managed to sell anything of value on Ebay, but were still left with piles of rubbish that needed to be cleared.  


Anything that couldn't be burnt or sold would have to be chucked out, so we hired a skip.


With some careful packing we were hoping to fit all of the rubbish in one 
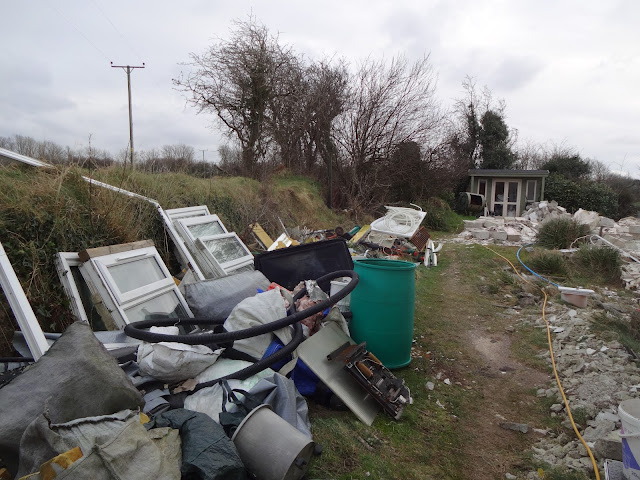
skip (skips are very expensive these days...) We started by loading all the biggest, heaviest items, like the old steel kerosene tank, radiators, oil boiler, and UPVC windows and doors


There was so much junk, but we managed to cram most of it into the skip. A lot more was wedged in after this picture was taken and by the time it was collected it was piled high.


Back at the site, we needed to break up all the concrete floors, but in order to get to them, we would first need to clear away a lot of the fallen rubble.


Each of the large blocks weighed around 50kg (that's two bags of cement), so we had to break most of them up into halves or quarters just so we could comfortably carry them to the various rubble piles that were forming around the perimeter.


More rubble needed clearing on the west side; the gable wall on this side had been particularly hard to demolish as the walls were more like a solid concrete bunker.


 Gradually we shifted the blocks out to the sides and started to expose the concrete floor slab.


Luckily there didn't appear to be any foundations under the house (which would have meant even more concrete to break up). The lowest blocks appeared to have been laid directly onto any old bits of slate that they found lying around when they originally built the place and had a thick layer of soil under them in place of mortar! That partially explains the horrendous problem with damp in that house.


Once we'd cleared the blocks, we could start demolishing the floor using an electric breaker. This particular section was pretty weak so luckily didn't take too long to smash up...


...but as ever, this accursed house was going to make things as difficult as possible for us and having removed one slab, we found another (much harder) concrete slab was hidden underneath. Sigh.


Finally that section was gone so we moved on to the next and repeated the process.


The site inspector arrived to conduct a through audit of our progress.


That's about half of the floors taken up.


Unfortunately there was a LOT of hardcore buried underneath the floors too. We didn't remove it as we planned to hire a crusher later and would need a firm base on which to operate. 


All the concrete we had excavated from the floors, was creating several more mountainous piles of rubble. We were getting concerned with the amount of material that we would have to deal with; for a small bungalow it seemed a ridiculous amount of rubble.


The other side of the floor needed a lot of clearing, thanks to all the additional slate and bricks from the top half of the fireplace.


Once cleared, the slab in this section of the house (our old bedroom) looked quite soft but also much higher and newer than the other floors.


There was something a bit odd about that floor... could this conceal the hidden treasure we'd been hoping for?


As we gradually cleared the site, we were getting a better idea of what the garden was going to look like and began to start planning what we might do with the space. 


The view from the main bedroom looked very different and so much brighter now the old house was gone.

Before:


 After:


The already-mountainous rubble piles were growing bigger by the day...


The old tiled kitchen floor was next...


It was all going so well. Only one section of concrete left and this was the 'suspiciously' new slab that we hoped concealed the long-awaited treasure.


With the slab removed we could finally peel back the plastic membrane and see what riches we had underneath...


Asbestos. 


Lots of asbestos!


  Nooooooo!


During the demolition, we'd seen a couple of bits of asbestos pinned in the roof which suggested the property had once been lined with it. It was clear that rather than pay to have it removed, they'd simply buried it under the floor. Or perhaps unscrupulous builders had taken money to dispose of it and buried it under the new floor when the owner wasn't looking. Either way, once again this accursed house was simply refusing to go quietly and we were left with another expensive mess to sort out.

It's not the most dangerous type of asbestos, but we still did not take any chances and a disposable hazmat suit and respirator were required. First step was to dampen it all down to reduce the amount of dust and fibres...


... then pick each piece up carefully by hand and load it into strong rubble bags... 


... which we then carried out to the front of the property (this is about half of them - we ended up with about 40 bags - grrr). Each bag was then sealed and loaded into another bag which was also sealed. Nobody would take the asbestos unless it had been double-bagged.


It was a great relief when we'd finally cleared all the asbestos. The irresponsible attitude of the previous builders had cost us a lot of extra aggravation, time and money.


At last we'd finished all the floors. The site inspector arrived in his company vehicle and toured the site before giving it his final approval.


Sunday 7 February 2021

Misc: kitchen larder - bedroom cupboard, etc

It was useful to have some indoor projects to do alongside the house demolition, as it allowed us to concentrate on them during the coldest, wettest winter days, when we just didn't fancy working outside. 

One of our main priorities was to finish the kitchen larder. We'd been using a temporary set of shelves (constructed hastily out of old pallets) for a couple of years, so it was about time we sorted the larder out properly. The one good thing about using the temporary shelves for so long was it demonstrated in practice what worked and what didn't work and would help us decide on the right final design.


The first step was to research what pre-made shelving was available to buy and how we could incorporate that into the relatively-limited space we had. Not many ready-made items were going to fit our purposes (or budget), so we ended up having to work out our own bespoke shelving. As ever, we used SketchUp to work out a detailed 3D design. 


Once we'd got the plan right, we ordered in all the materials we'd need for construction and got to work. In the bottom part of the larder, we would be using pull-out mesh drawers (for potatoes, onions, bread, etc). Removing the old temporary shelves was easy enough...  


... then it was just a matter of screwing in a single metal support. We used the Elfa shelving system which is very good, albeit ridiculously overpriced. The cheaper alternative made by IKEA wouldn't fit inside the dimensions of our cupboard (note to self: next time design the cupboard size to allow for cheaper shelving systems). 


Once the main support bar was in, the rest of the shelves simply clicked into place. The Elfa system does seem very easy to use and well made.


The baskets fit perfectly and open out smoothly on little rollers.


Next we fitted the lower shelf which goes directly above the pull-out baskets. The picture below was just a test-fit to check everything was lining up correctly. 


We designed the stepped shelf for storing tin cans. It also doubled up as a kind of bracing bar, to secure the two right-angled sections of shelf together, using cunningly-hidden screws.


The tins fit well and the step allows clear access to the ones in the back. Wherever possible we adapted the design around standard wood sizes, to minimise the amount of cutting and planing needed. 


Although the shelves were made from 25mm thick timber, to stop any chance of the shelf bowing in future, we added supports at the back made from leftover door stops. Once painted these would be barely visible so it was well worth doing. 

We did consider making completely invisible supports for the shelves but it would have been a lot of extra work and rather unnecessary for a functional cupboard.


Getting everything level in all directions was crucial.


We had to work around the boxed-in pipe which runs directly through the larder. This was useful for attaching shelf supports, but meant the shelves themselves would need to interlock with each other where they overlapped in the corners.


The bottom shelf in the picture has been notched to complete the 'wraparound' effect. The notch was measured pretty easily by placing one shelf on top of the other and drawing around it...


... so once cut it should be a pretty close fit.  


All the gaps will be filled and painted once everything is securely screwed in place.


We'd planned for another stepped shelf - this one would be three-tiered and used for herbs and spices.


Once again, we'd designed it using standard sizes to minimise cutting and planing. Most of the timber was pre-primed, moisture-resistant MDF and was sold for use as skirting boards and architraves, so lots of different widths were available.


Test fitting the 'steps'.


Quite an easy way to build a spice rack. Once filled and sanded all the joins in the timber will disappear and the whole thing should look like a solid stepped shelf.


We would also be fitting four mesh baskets to be used for holding small bottles, like oils and condiments. 


Once all the shelves had been screwed down securely, we filled and sanded everything so it was perfectly smooth.


Then both walls and woodwork were given a couple of coats of paint. The cupboard looked pretty good once we'd applied a good quality eggshell paint and would also be easy to wipe down in case of any spills.


We would be fitting another two baskets above these later (delayed delivery).  


To store all the herbs and spices, we bought a set of matching jars. These ones were the perfect fit for the stepped rack and were not expensive.


It's not as OCD as it looks - after all, they're not even in alphabetical order... (however they are ordered with the most-used at the front and least-used at the back...)


Along with the spice jars, we added a few more Oxo Pop containers for the middle shelves on both sides of the larder. 


The gaps between the shelves were sized to allow for these containers.   


Compared to normal kitchen cupboards, even a relatively small larder like this can hold a huge amount of food and allows us to get at everything easily. 
 
The larder was always part of the house plans, so we deliberately omitted underfloor heating from that area. It works really well, as the larder remains nice and cool, even on hot days, to help preserve the food.


We also tackled the cupboard in the spare bedroom.


There are two narrow cupboards that run between the front bedroom and back bedroom. The original idea of these was to provide storage space for both bedrooms, while also allowing for some separation between the rooms. This meant that the bedrooms would have not one, but two soundproofed walls (and a small gap) between them to hopefully reduce sound transfer and increase privacy. Years of living with noisy neighbours made us a bit paranoid about sound.

Here's that bedroom wall going up back in 2015, with the cupboard in the far corner...


...and the two walls of the cupboards that separate the bedrooms.


Back in the present day, the inside of the bedroom cupboard was looking a good deal more finished, albeit a little bare.


Once again we were using the Elfa system which made installation straightforward. Once the vertical bars had been screwed onto the wall...


... all the shelving simply slots into place.


On the opposite wall, we made the most of the limited cupboard space by using some shallow mesh baskets.


We fitted a series of hooks along the top bar.


To finish it off, we added a wardrobe rail that runs the full length of the cupboard. 


These drawers are a lot deeper than the ones in the kitchen larder, so can hold plenty of stuff.


That's the spare bedroom cupboard completed. It functions as a kind of wardrobe/chest of drawers so means that we don't need to buy any additional furniture for the room (plus because it's 'fixed' to the structure of the house, we can also claim back the VAT for the materials as part of the house build).