
...with a temporary sink made out of an old adhesive bucket.

And a temporary OSB worktop fitted over the kitchen island.

Finally, 8 months later, we were ready to install the permanent worktops. We'd looked closely at various materials (granite, quartz, composite) but had decided that we wanted to go for stainless steel.
As ever, to save money we would be fitting the worktops ourselves. In preparation for their delivery, we had to dismantle the kitchen, removing all the temporary fittings and appliances so that the stainless steel could be dropped straight into position.

Preparing the units that would house the sinks required quite a lot of work. We adapted the 'false' top drawer so that it could be removed and refitted easily for access, as the plumbing would have to be redesigned to accommodate the extra depth of the sink and drainer.

We removed the top drawers, along with appliances such as the dishwasher and oven, to allow space to secure the worktop to the units. We pre-drilled holes in the top of the units to ensure that the screws would 'pull' the worktops down tight into place.

All prepped and waiting for the worktops...

... and immediately following delivery.
The driver helped us carry the heavy worktops in and we slotted each one straight into position. That way we didn't need to worry about storing or moving them later, plus we could check straight away that they had been made correctly and were fitting as they should.

Fitting the stainless steel worktops was reasonably straightforward. This was the kitchen bin unit prepared for its new worktop.

We pre-drilled holes at a specific diameter, so that the screw thread would not bite into the kitchen unit, but instead bite into the worktop and pull it tightly down. When the stainless steel is wrapped around the MDF core, it can cause the worktops to bend, so this ensures that the surface sits perfectly flat on top of the units.

The base of the worktop is made from two layers of moisture-resistant MDF which is then clad in a layer of stainless steel. We were supplied with a higher quality 316i grade stainless steel (rather than standard 304) which scores better in a kitchen environment, as it offers more protection and hygiene against heat, cleaning chemicals and food juices.
We had chosen to use Stainless Direct UK and were particularly impressed with the build-quality of their worktops (as shown in the photo of its underside below). The way it had been wrapped seamlessly around the MDF core with its edges rounded off, was a lot more refined than some of the rather 'agricultural' finishes we'd seen at several local workshops.

The worktop had all been custom manufactured to fit the shape of the walls (no matter how hard you try, these are never perfectly straight) so we were relieved to find that once screwed down, it sat neatly in the corner with no unsightly gaps. Nevertheless, the manufacturer supplied us with grey CT1 silicone which we 'buttered' along the edges prior to fitting to ensure that no moisture could penetrate between the walls and the worktop.

We had specified the model of sink we wanted during the ordering process and the supplier had welded both this and the splashbacks seamlessly into place, so it appeared as if the whole thing had been pressed out of one sheet of stainless steel. Great from a hygiene point of view, as there were no gaps or silicone joints where dirt and mould can collect. Probably why they use stainless in professional kitchens.
We'd had some issues when originally boarding the the kitchen wall, so knew that the gap would be a little more uneven along this section and would require more work to seal using CT1. Once we'd lined up the worktop in position and secured it with screws, it was time to address the revised plumbing layout under the sink.

Our 'bucket' sink had used a temporary plumbing layout, but the permanent sink was going to need everything changed around and compacted.

Having kitchen drawer units (rather than cupboards) under sinks throws up a number of restrictions for the plumbing, as it severely restricts the amount of space available.
This took a bit of planning; using push-fit plumbing allowed us to switch things around relatively easily, but it was still going to be quite a squeeze.

Once the new hot and cold water pipes for the kitchen tap were in, we installed the new trap. To keep the plumbing clear of the bottom drawer, we had to get quite creative with the dishwasher waste outlet...

...and with additional pipes for the vented trap and sink overflow, it got even busier.
The picture shows how the top drawer has a wire frame designed to accommodate the under-sink plumbing.

Along with fitting the plumbing, we also installed the new kitchen tap. This one includes a built-in sprayer for washing vegetables, etc.

Plumbing completed and everything reassembled. After 8 months using an old 'bucket', having a proper tap, sink and drainer felt like a real luxury.

The stainless steel worktops matched our appliances, plug sockets and switches and hopefully gave the kitchen a more contemporary feel.


Our kitchen supplier did not supply gloss panels large enough to cover the ends of the island in one piece, so we had been forced to use two sections. In order to hide the gap between them, we asked the worktop manufacturer to supply us with some stainless steel strips that matched the worktop...

...and we simply glued these strips in place using the CT1 silicone.

The cover strips really helped finish off the island and looked like an intentional design feature.

The site inspector did the rounds, ensuring that everything matched his impossibly high standards.


There were lots of small details to finish. The gap above the dishwasher (arrowed) looked a bit generous...

... but luckily we had lots of gloss panel off-cuts left over. It looked a lot neater once a filler panel had been installed.

The utility room would be getting the same stainless steel treatment. Just as in the kitchen, we prepped the units before the delivery day so that everything would be ready.

Once again, we removed the 'false' top drawer to give us enough space to slide the worktop sink in (dropping it in from above would have destroyed the painted walls).

Once the top drawer front was removed, we needed to figure out a different way of reattaching it after the worktop had been dropped into place. Roof battens to the rescue (again)...
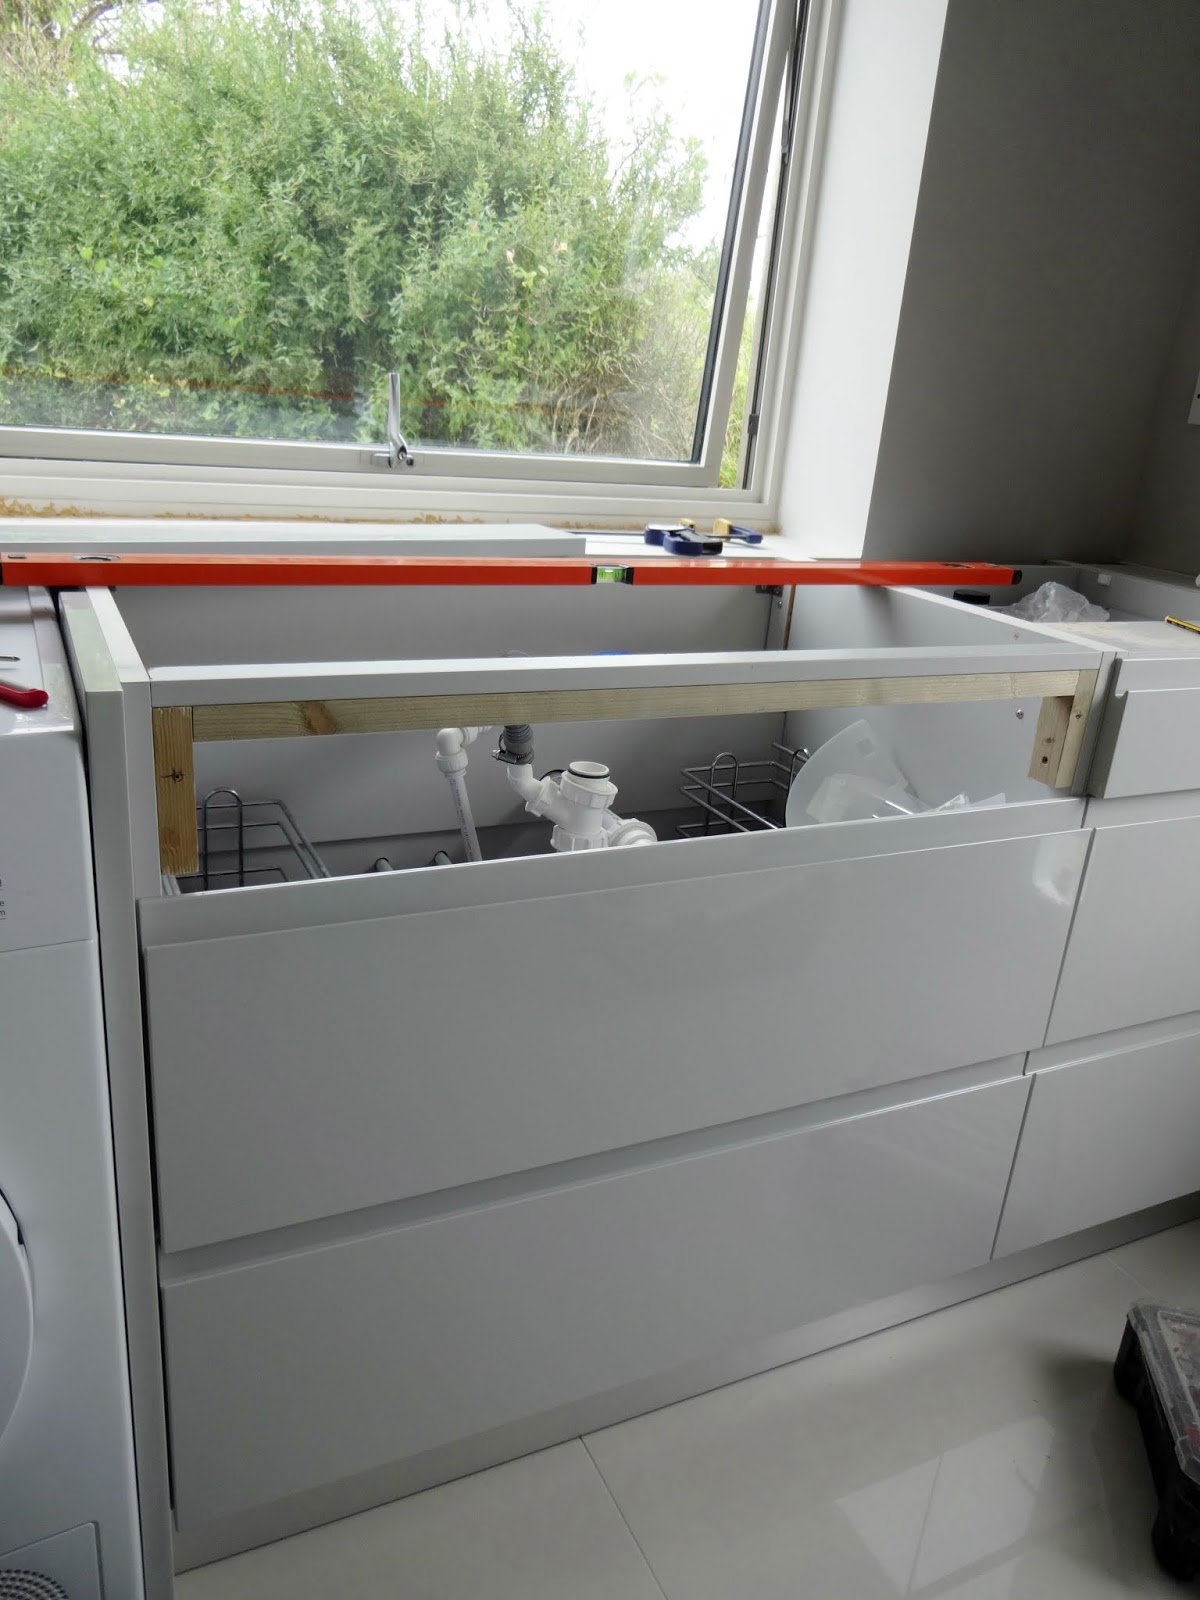
The adapted top drawer panel could now be removed and refitted from below and the battens ensured that it sat perfectly in line with the other drawers without any need for adjustment.

We added a section of hardboard onto the window sill to give the worktop an imperceptible slope, so that any water splashes would always drain away from the window and back towards the sink.

Finally, we fitted some heavy duty angle brackets onto the wall. These would support the worktop above the appliances where there were no kitchen units.

As before, the delivery driver helped us slide the worktop into place.

The worktops had been cut by computer and they even carved fancy name labels into the underside of each piece.
We screwed the worktop to the brackets at the back. Not the most elegant solution, but they are completely hidden by the appliances.

The fit wasn't as tight as we'd hoped around the inside of the window (more on that later).
We'd chosen the same sink and drainer as in the kitchen and once again were impressed with the way it had been welded seamlessly to the rest of the worktop.

New electric sockets (on the left) below the worktop for the washing machine and tumble drier.
As in the kitchen, we needed to rejig the plumbing in order to accommodate the deep sink.

Once the plumbing was in place, we fitted the tap - exactly the same as the one in the kitchen.

With the worktop screwed down firmly on all sides and all the plumbing finished and tested, we could start putting everything back together.

The top drawer panel clipped neatly into place...

... followed by the rest of the drawers.

