After much research and speaking to several specialist underfloor heating installers, we decided the best option for us was a dry screed floor-on-floor system - and this is what we did...
We started out with a clean, dry plywood floor which had been installed as part of the timber frame construction.

Next we screwed down lengths of batten. We had to plan the batten layout around how the underfloor heating pipes were going to sit.


As well as screwing down the battens, we used a strong wood glue to help minimise any future creaks or squeaks when walking on the wooden floor that would eventually go on top of this layer.

We tried to screw the battens directly into the floor joists below wherever possible for extra rigidity.

One unexpected problem we encountered was that the electricians had run cables right under the plywood floor, so we had to keep checking and measuring from the ground floor below to avoid screwing into any wiring.

The site inspector kept a close watch on our progress.


Batten-fest! 78 square metres of floor space had to be covered.


We had to constantly keep in mind how the heating pipes would fit around the battens and leave gaps and pathways where needed.

We had an underfloor heating plan pinned up for reference along with our own batten plan.

Once all the battens had been fixed in place, we installed the underfloor heating manifold. Having watched the plumber install the downstairs manifold, Alan felt confident enough to do this himself.


Each circuit of underfloor heating pipe has to be laid in one unbroken run. The large coil of pipe goes from the manifold, runs around its designated room before returning back to the manifold.

Alan fitting the underfloor heating pipes to the manifold.


In order to maximise the heat pump efficiency, the plan called for the pipes to be laid quite close together. This meant that we had to take extra care when bending the pipe loops to avoid kinking them.

This is one full circuit completed in bedroom 3. The second half of the room will have another circuit installed. It is more efficient to use two shorter circuits, rather than one long run, to minimise heat losses.

As each circuit is completed, the road to the manifold becomes ever more congested.

The main bedroom uses three circuits. The one pictured below heats both the walk-in wardrobe and the en-suite bathroom...

... whilst the other two circuits cover the rest of the main bedroom.


To ensure that the pipes were equally spaced out (avoiding any cold spots) we cut blocks of wood to appropriate sizes and used them as spacers. Much easier and quicker than constantly measuring every loop.

We had several late nights working to get it all finished. The landing was particularly tricky as it was the main thoroughfare for all the pipes going to and from the manifold.

The manifold with all the pipes completed. A tight squeeze.

Planning the pipe runs for the bathrooms was more involved as we needed to take into account where all the bathroom furniture was going to be positioned. We had marked out the showers and the toilets but we were still unsure exactly where the bath would sit. The best solution was to buy the bath, haul it upstairs and decide from there.
The bath ready to be hoisted up using a pulley.

We tried placing the bath in different positions before finally agreeing where it should go. Since Alan and I differed in our opinion, this took some considerable time!

After the historic compromise had been reached, we finished the pipe circuit for the bathroom.

With all the circuits complete, Alan filled the system with water, flushed any air out of it and pressure tested it. Once we were happy that there were no leaks, we started work on the dry screed.

As we were new to this, we used the walk-in wardrobe as a test bed.

Once we were happy with the result we got going on the rest of the rooms.

We had plenty of sand and cement left over from the outside render. Alan hauled up heavy buckets of sand using the pulley...

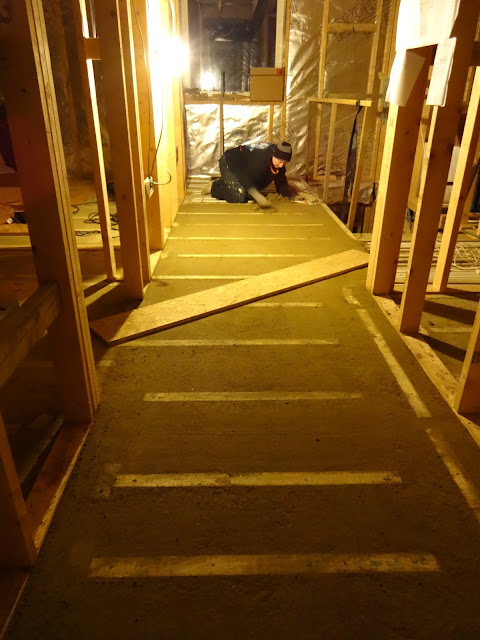
... and then we mixed each batch with cement by hand (or rather by shovel). This was physically hard work as we were laying 78 square metres of screed. I wish we'd hired a cement mixer as this would have saved us a lot of time and backache!

While Alan went to lug more sand, I spread and levelled the screed over the pipes between the battens.

The site inspector would often drop by to check on our progress...
Luckily he seemed satisfied with my work.

Halfway there...

Working late again...

Using a dry screed is very effective compared to other underfloor systems such as metal spreader plates. It is a lot cheaper in materials, has greater thermal mass (so it will conduct and hold the heat from the pipes more efficiently) and is relatively straightforward to install.

The one big drawback of this system is the weight - dumping several tons of sand and cement onto a standard floor construction would not be a good idea! Critically, we had decided to use a dry screed system upstairs at a very early planning stage before we had finalised the design of the timber frame. This allowed the timber frame company to calculate the structural effects of the extra floor loading and they beefed up all the floor joists accordingly.

Hooray! The underfloor heating upstairs is completed. Though it was hard work, by doing it ourselves we had saved a few thousand pounds.

On a sad note, poor Custard passed away during this time. She used to love sleeping on the big pile of sand outside the front door. Here she is enjoying a rest on her beloved sand mattress.